Learn what valve lapping is, why it is essential for engine compression, and how to perform the valve lapping process step-by-step using lapping compound.
What is Valve Lapping? A Complete Guide to the Process and Benefits
Whether you are rebuilding a classic car engine, repairing a motorcycle, or maintaining industrial piping systems, ensuring that valves seal perfectly is non-negotiable. If a valve doesn’t sit flush against its seat, fluids or gases will escape, leading to a massive loss of efficiency, compression, and power.
To prevent this, mechanics and engineers use a technique known as valve lapping. But what is valve lapping, and why is it so critical for engine and mechanical health?
In this comprehensive guide, we will break down what valve lapping is, why it matters, the tools required, and the step-by-step process of how it works.
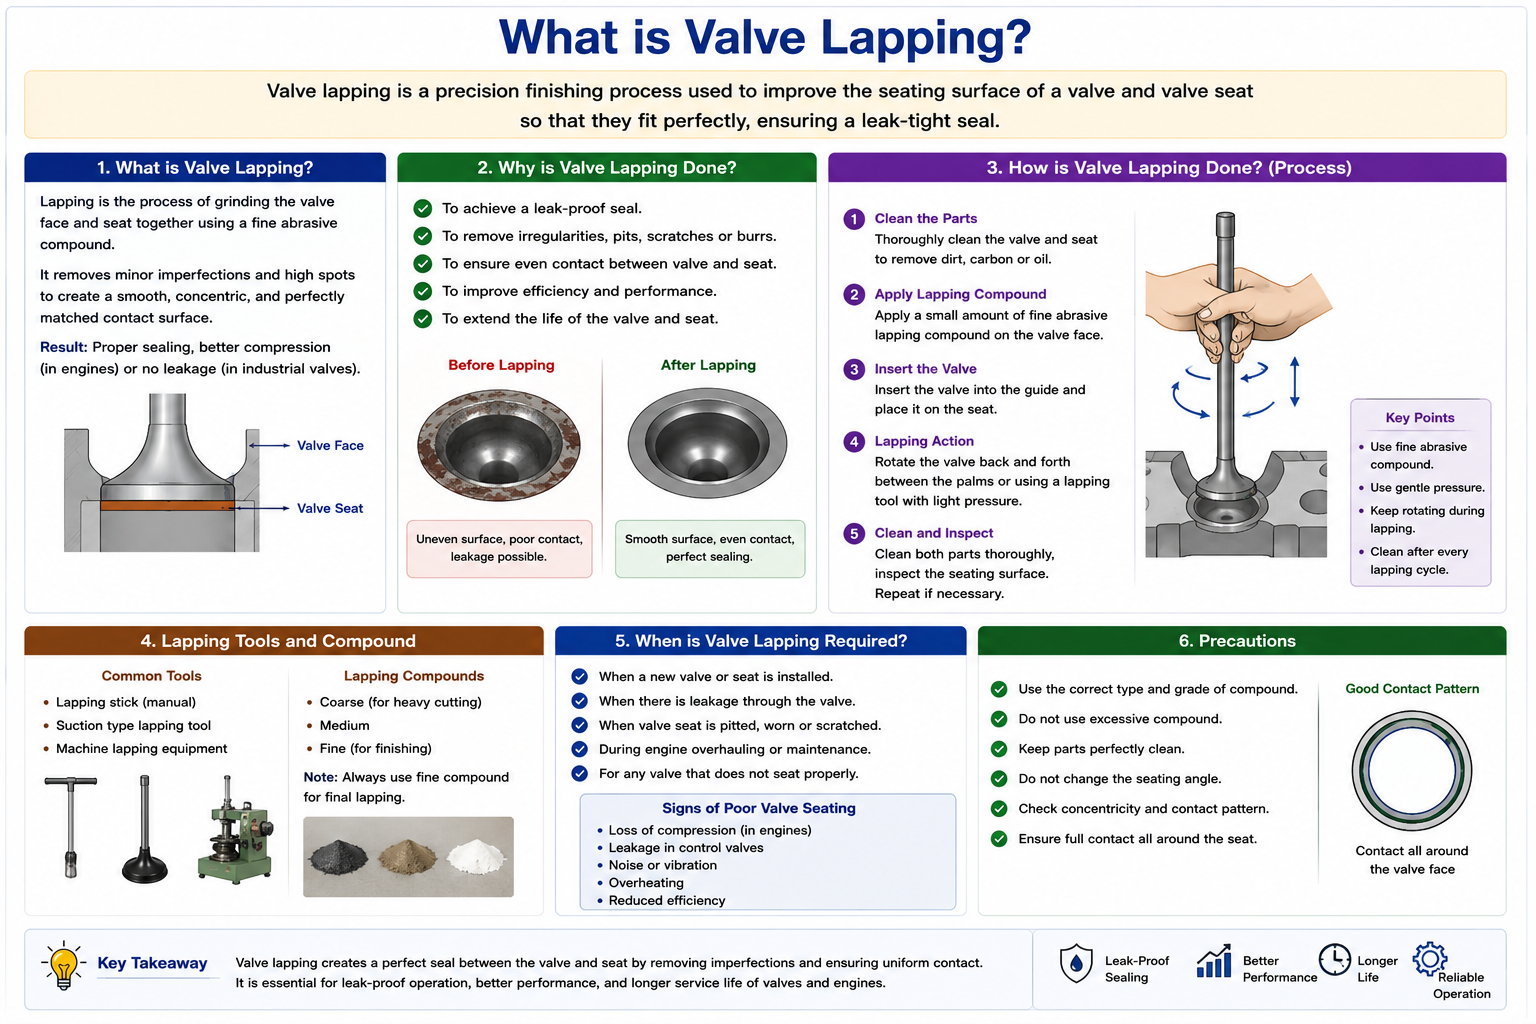
What is Valve Lapping?
Valve lapping (sometimes called valve grinding or valve seating) is a machining process used to create a perfectly flush, gas-tight seal between a valve face and its corresponding valve seat.
Even when a new valve and a new valve seat are machined to incredibly tight tolerances at the factory, their surfaces are microscopic landscapes of peaks and valleys. If installed as-is, microscopic gaps will allow gases to leak. Valve lapping solves this by using a mildly abrasive paste (valve lapping compound) to gently grind the two specific mating surfaces against one another until they form a perfect, custom-matched seal.
Why is Valve Lapping Important?
In an internal combustion engine, the intake and exhaust valves must seal the combustion chamber completely during the compression and power strokes. If the seal is imperfect, several problems occur:
- Loss of Compression: Escaping air and fuel mixtures lead to engine misfires, hard starting, and a significant loss of horsepower.
- Burnt Valves: The exhaust valve cools down by transferring its extreme heat to the valve seat in the cylinder head. If the valve isn’t seated perfectly flush, heat transfer is blocked, causing the edge of the valve to melt or “burn.”
- Poor Fuel Economy: A leaking valve prevents complete combustion, causing the engine to waste fuel.
Note: While most commonly associated with automotive engines, valve lapping is also heavily used in industrial piping (like globe valves or gate valves) to prevent high-pressure fluid or gas leaks.
Tools Required for Valve Lapping
The valve lapping process is relatively simple and requires only a few basic, inexpensive tools:
- Valve Lapping Compound: A grease-like paste containing abrasive silicon carbide particles. It usually comes in two grits: Coarse (for initial grinding) and Fine (for the final polish).
- Valve Lapping Stick (Suction Cup Tool): A wooden dowel with rubber suction cups on the ends used to grab the flat top of the valve and rotate it.
- Prussian Blue (Optional but recommended): A high-contrast machinist’s dye used to visually check the quality and placement of the seal.
- Clean Rags and Solvent: For cleaning the valve and seat before and after the process.
The Valve Lapping Process: Step-by-Step
If you are rebuilding a cylinder head, here is the standard procedure for lapping a valve:
Step 1: Clean and Prepare
Ensure the cylinder head, the valve seat, and the valve itself are perfectly clean and free of carbon buildup, oil, or debris.
Step 2: Apply the Lapping Compound
Dab a small, even amount of coarse lapping compound around the angled face of the valve (the part that contacts the seat). Be extremely careful not to get any compound on the valve stem, as the abrasive paste will destroy the valve guides.
Step 3: Insert and Attach the Tool
Slide the valve into its guide in the cylinder head. Press the suction cup of your valve lapping stick firmly onto the flat head of the valve.
Step 4: The Lapping Motion
Place the stick between your palms and rub your hands back and forth rapidly, spinning the valve against the seat. Periodically lift the valve slightly, rotate it a quarter turn, and drop it back down to ensure the grinding compound is redistributed evenly. You will hear a gritty, scratching sound. As the metal smooths out, the sound will become quieter and smoother.
Step 5: Switch to Fine Compound and Inspect
Wipe away the coarse compound and repeat the process using the fine lapping compound for a smooth finish. Once complete, remove the valve and wipe both the valve face and the seat completely clean.
What to look for: You should see a continuous, dull gray, unbroken ring around the entire face of the valve and the corresponding seat. If the gray ring has breaks, skips, or uneven widths, the valve is not fully seated, and the process must be repeated.
Step 6: The Final Clean
This is the most critical step. Wash the valves, seats, and valve guides thoroughly with parts cleaner or solvent. Any leftover lapping compound will act like liquid sandpaper inside your engine and cause catastrophic wear.
Conclusion
To summarize, valve lapping is a critical procedure for marrying a valve to its seat, ensuring a 100% leak-proof seal. Whether you are dealing with a high-performance racing engine, a standard commuter car, or high-pressure industrial fluid valves, mastering the art of valve lapping is essential for maintaining maximum efficiency, safety, and operational performance.
Frequently Asked Questions (FAQs)
Can I use a power drill to lap valves?
While some mechanics use a drill on a low-speed setting to save time, it is generally discouraged for beginners. A drill spins too fast and in only one direction, which can create uneven grooves in the valve seat. The traditional back-and-forth hand motion yields the best, most uniform results.
Do new valves need to be lapped?
Yes! Even brand-new valves and freshly machined valve seats are not perfectly matched to each other. Lapping new valves is standard practice to ensure a gas-tight seal before final engine assembly.
How do I test if my valve lapping was successful?
After lapping, cleaning, and installing the valves with their springs, lay the cylinder head flat and pour a thin liquid (like rubbing alcohol or mineral spirits) into the intake and exhaust ports. Wait a few minutes. If the liquid seeps past the valve into the combustion chamber area, the seal is not tight enough, and you must lap the valve again.